Blog › How to 3D Print a Terrain Map (from Any Place on Earth)
How to 3D Print a Terrain Map (from Any Place on Earth)
Printed terrain models used to need GIS software, mesh repair tools and an afternoon of cleanup. They don't any more. Here is the whole path from "a mountain I like" to a sliced print, using the browser and nothing else.
Pick your terrain
Open the terrain app and choose one of three ways: a named region (232 countries, with country/state/county drill-down where geoBoundaries publishes it), a box drawn anywhere on Earth, or a GeoJSON polygon if you need an exact boundary.
Two picks matter for printing:
- Relief controls vertical exaggeration. Around 8 percent reads well on screen; for print, 10–15 percent makes ridgelines more tactile without distorting recognizable peaks. Flat coastal areas tolerate more exaggeration than alpine ones.
- Buildings can ride along if your view is town- or city-scale — every OpenStreetMap footprint (via Overture Maps) extrudes at its tagged height and travels into the STL.
Export the STL
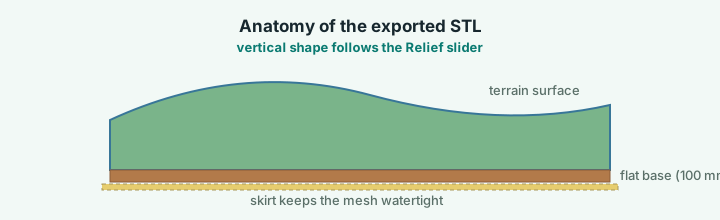
Choose the print scale in the Export panel — fit a 180 mm print bed or a fixed 1:5,000–1:50,000 ratio. The export is a single watertight solid: millimetre units, flat base with a small skirt that keeps the mesh closed. Slicers open it without repair — Bambu Studio, PrusaSlicer, Cura and OrcaSlicer all take it as-is. A colour-coded 3MF export (terrain, buildings and route as separate bodies) is available too. If you print routes, the GPX line is raised on the terrain in the STL/OBJ/GLB and 3MF exports.
Slicer settings that actually matter
| Setting | Value | Why |
|---|---|---|
| Layer height | 0.2 mm | Real ridges are gentle slopes; lines disappear |
| Supports | Off | Terrain never overhangs |
| Infill | 10–15 % gyroid | The base skirt is solid anyway |
| Ironing | Optional | Nice on plateaus, wasted on steep faces |
| First layer | Slowed down | The base is a large single footprint |
Rescale freely in the slicer afterwards — uniform scale keeps the vertical proportions you chose with the Relief slider, so a 200 mm slab is simply the same model, twice as wide.
What people print
Watersheds and canyon rims print beautifully because their forms stack. Islands work — the coastline reads like a relief map on your shelf. City prints are a different hobby: a whole downtown at 180 mm is fine detail territory, so pick a neighbourhood rather than a metropolis, or print the quarter you actually know.
If your route is the story — a hike, a climb, a gran fondo — drape the GPX on the terrain first. The route is draped as a raised line on the terrain in the STL/OBJ/GLB exports too.
One honest caveat
The elevation source is about 30 m resolution globally (much finer in some countries). That is plenty for anything you can hold, and it is the same data your GPS watch and every hiking map use. It will not resolve an individual rock spire — print the mountain, not the boulder.
Try it while it's fresh
The whole tool runs in your browser — pick a region, shape the relief, export. No account, nothing to install.
Open the terrain app